Thursday, May 26, 2011

Make Your Own Quilted Fabric

Yesterday I posted about the Kindle case I made for my mom. Remember the quilted fabric I made for the lining?
Quilted fabric is great to use on a variety of projects, as it has built in padding and makes for a more sturdy construction than unquilted cotton. But if you buy it prequilted at the store, it's upwards of $20 per yard. So today I thought I'd show you all how I did it. Maybe you all know how already...but maybe you don't? If not...read on! :)

Step One: Cut your fabric. 
You will want to cut 2 pieces of fabric per each single finished quilted piece you'll need. Cut your fabric an inch longer and wider. In this example, to make ONE piece of quilted lining, size 8"x10" for the Kindle case, I cut TWO rectangles 9"x11".
Also cut out one piece of batting size the same size as your fabric above.
Step Two: Draw your quilt lines.
I'm sure real quilters don't need to draw grid lines, but I do. And it was easy. On the piece of fabric that was going to be the WRONG side of my quilted fabric, I just drew out the grid lines with a pencil using my cutting map and ruler. Both have 45 degree angle lines, and so I just used those as a guide and drew out a grid.
Step Three: Pin your fabric & batting together.
Make sandwich the batting between the two WRONG sides of your fabric.
Step Four: Sew along your quilt lines!
Step Five: Trim to size as needed.
As you quilt (or maybe it's just me...hmmmm?) the fabric will shift a bit, leaving you with a bit of an off kilter rectangle. This is why we cut the fabric an inch on each side bigger than we needed...it gives you the leeway to square up your edges. Now you have nice even edges and are ready to use it in your project.

There ya go! 
Make it in super cute fabrics and save a bundle in the process!

Wednesday, May 25, 2011

A Kindle Case for Mom

My mother gave me an ever so subtle hint a few months ago that she'd like a kindle case for Mother's Day. It's a good thing she's incredibly patient, since she just received it in the mail. Better late than never right?
I looked at a bunch of tutorials online on making a simple "envelope" style case, but being a glutton for punishment, I decided this one needed a zipper closure instead...
And piping accent trim...
And if you look closely, you can see that on one side, I goofed up a bit while sewing in the piping. I didn't get the seam close enough to the cord of the piping, so it left a gap between the piping and the side seam. Instead of ripping out the seam and re-sewing the piping in closer (ugh) I decided to add a "tab" over that gap. It kinda looks like I meant to do that, right? Kinda?!
I also wanted to use quilted fabric for the lining. But do you know how much quilted fabric is? Like $20 per yard. Eeek! So I made my own, which although time-consuming, is much cheaper, easy to do, and you can use cute, coordinating fabric!
And finally, I made some crushed fabric flowers and a couple embroidered felt leaves to pretty up the outside.

Phew. Needless to say, there was a steep learning curve for me with this project. It was only the 2nd zipper I had ever sewn, my 2nd time using piping, and my first time quilting my own fabric. But I like how it turned out...and it was time well spent for my dear Mama!

I used the following tutorials extensively throughout this project...taking tips from each one. Even if you don't need a kindle case, you can use these tutorials to make great zippered pouches for all sorts of things!
>Photobucket
flexible dreams

Tuesday, May 24, 2011

The Little Table That Could

Is it just me or has everyone had a table in this style and finish at some point in their lives? I bought this set ten years ago at a yard sale...and who knows how old it was when I bought it?
The "BEFORE"...the little table pretending to be a dining table in our last house.
The style is ok, but I've never liked the finish. It's just a little too country for my taste. I like my country on the radio, not in my kitchen. The chairs kicked the bucket months (which probably should have been years) ago, but this little table is not even the least bit wobbly after all these years. And the fact that it's on the small side has been a bonus, as we have lived in some tight quarters before. So alas, it has followed me around from place to place through our many moves, and was showing a lot of wear and tear as a result.

Motivated by my endless talk that we desperately needed to upgrade our table to something from this century, my dear husband offered to help me give it a little face lift!
He sanded the top to the bare wood, stained it this great walnut color, and topped it off with 4 coats of poly.
 He spray painted the legs an almond color. We used Rustoleum, which gives awesome coverage without all those drippy drips.
And I absolutely LOVE the result.
I guess this little table will be sticking around for a while longer.

And remember these beloved chairs? (I posted about their makeover here.) They're a bit big for this little table, so they'll be relocated to our dining room in our new house...and this little table will become our breakfast table in our new  kitchen.


Linking to:
My Uncommon Slice of Suburbia

Monday, May 23, 2011

Cheap & Cozy Sleeper

Good morning and Happy Monday to ya all. Things have been busy in the D&G craft room, although you wouldn't know it looking around this blog. I know, bad, neglectful blogger! 
Taken this weekend...28 weeks!
Can I blame it on the baby in my belly? 
Considering so many moms with actual kids manage to blog EVERY. SINGLE. DAY...probably not. But I promise I have a stock pile of projects ready to post...so stay tuned!

But since I have your undivided attention, here's a little fleece sleeper sack that I whipped up yesterday.
 If you remember, I made one of these a few months ago. This time I used a fleece fabric remnant I bought before Christmas in the Joann's clearance bin. I bought it because it was $2 and I just loved the colors!
I managed to squeeze all the pattern pieces out of the half yard. (Which is why you can see the print goes in different directions!)
This is the easiest pattern I've ever used...literally it took me less than a half hour to make. 
Time well spent for a cozy & cheap little sleeper!

Monday, May 16, 2011

Alexa's LBB Birthday Dress

Happy Monday! Hope you all had a great weekend. It was a rainy couple of days here in PA...so G & I got some good relaxing time in. But we also were able to finish up a couple of projects, which will come later this week!

But onto today's post. Today is our niece Alexa's 6th birthday! Last week I posted about her flip flop party favors I made. (Word on the street is that they were a hit with the party guests...woohoo!) Anyway, as her birthday present, I made her a birthday dress!

I made a LBB Sienna dress (quickly becoming my favorite thing to sew!)
The pink & purple sections are cut from 2 clearance t shirts I bought at Walmart for $1.50 each.
They were both womens XXL shirts, and after making this size 6 dress, I had enough left over to make a pint sized mini dress for her American Girl doll. Seriously, how stinkin' cute is a matching doll dress?!
The sleeves are made from a heart knit remnant I bought at Joann's months ago.
I added a "6th Birthday" appliqué on the back.
When I showed the finished product to my husband he said, "Wow, that is one bedazzled dress!"
I guess it does have some serious bling...but what 6 year old doesn't love a little bit ok, a lot of glitter?
(Please let this stand as my public apology to my poor sister in law, who will now forever be cleaning up those sparkles!)

Happy 6th Birthday, sweet girl!

Wednesday, May 11, 2011

Lemonade Yogurt Cupcakes

When life hands you lemons, make cupcakes!
Being that there are only two people in my household, anything I bake is inevitably eaten by either myself or Greg. And we all know that a batch of cookies or cupcakes means at least 12 to 24 treats going down the hatch. All pregnant jokes aside, I have no business eating 24 cupcakes. What's a girl to do?

Lemonade Yogurt Cupcakes!

This was a little experiment I did. The idea is very simple. (Which if you know my baking skills, is my kind of baking project!) 

Directions:
1. Start with any white cake mix. Add the water & egg whites as directed.
2. Substitute fat free lemon greek yogurt equally for the oil. (I have an ongoing love affair with Chobani so that's what I recommend...but you can use whatever brand you'd like.)
3. Add in the zest of one half to one whole lemon...depending on how lemony you like things.
4. Mix and bake as directed.

When they were cooled I glazed them with this Lemon Yogurt Glaze recipe
Why can't anything I bake look this pretty?
The cupcakes were not as light and fluffy as traditional cupcakes are...they were more like pound cake. But they were definitely husband approved. And for an essentially fat free & cholesterol free cupcake...I was willing to sacrifice a little fluff in order to indulge guilt free!

Tuesday, May 10, 2011

Flip Flop Party Favors

Moving right along with birthdays...our niece Alexa is hosting her 6th birthday party this weekend! She chose to have a "flip flop" themed party. First of all, how cute is that? I love it. Her mama recruited me to make some party favors for the lucky little girls attending.
I started with Old Navy flip flops in pink & purple. A steal at $2.50 per pair.
I made the bows out of ribbon...a purple or pink polka dot bow and a "flip flop" printed ribbon bow on top. 
The entire bow is held together with a thin ribbon tied through a button. And a bit of hot glue for reinforcement.
I glued the bows onto the flip flops with GOOP, and held them down with clips during drying. They seemed to be pretty firmly attached when they were dry.
We'll see how well they hold up to a group of dancing, twirling, partying 6 year olds!

Monday, May 9, 2011

Personalized Beach Gear

Our niece Ally turned 10 a few weeks ago. Her family lives in Clemson, South Carolina, and if you know anything about this town...they bleed orange and purple! Ally's on the town's swim team, so I made her a quick birthday present of a few swim "accessories" to use after swim practice, or on one of their many trips to the lake.
The purple terry cloth cover up I picked up at Target, and added an "A" for Ally to the front...
and the iconic Clemson tiger paw to the back.
I used an orange washcloth to make both appliqués. Any old fabric would work, but I liked the idea of keeping this beach/swim dress consistently terry cloth.
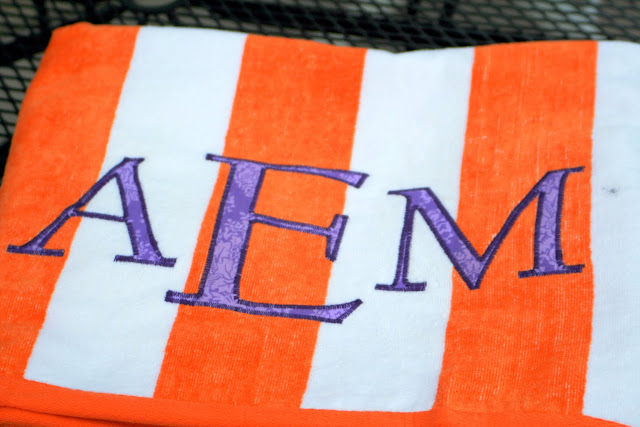
I also picked up this orange & white striped beach towel (for $6.99!) again, from Target, which I monogrammed with Ally's initials.
The letters are just an applique I cut out of regular quilters cotton. I did changed my stitch setting so that the zig zag stitches were super close together...both because I hoped it would help against fraying and I liked the border that it created. I also treated the edges with fray check. Not sure if that will help or not, but towels get a lot of heavy use, so I figured it couldn't hurt.
With my various projects the last few years for Ally & her family, I'm getting pretty good at these tiger paws...maybe I need to set up shop in Clemson?!
This project was so quick & easy, everyone should make some swim or beach gear for your favorite team! 
A fun way to root for the home team while soaking up the sun.

Sunday, May 8, 2011

Happy Mother's Day

Happy Mother's Day to all the beautiful mothers in my life!

My Mom, Grandma and I on my wedding day.

 I am so blessed to have so many wonderful mothers in my life. My sister, grandma, sister-in-laws, mom-in-law, girlfriends, and of course, my own mom. And this quote so very much sums up my selfless mother...

"A mother is a person who seeing there are only four pieces of pie for five people, promptly announces she never did care for pie."
Tenneva Jordan

Mom...keep that pie for yourself today! You so deserve it. :)

Wednesday, May 4, 2011

DIY Maternity Dress at "Be Sweet."

I do exist! G and I have had a fair share of visitors in the last few weeks, so I have been busy planning, cooking, cleaning, and playing tour guide. So the blog has been on the back burner for the last few weeks.

BUT I'm SO happy to be back at it, with a guest post over at Be Sweet!! Be Sweet is an adorable blog written by one of my best friends Amanda. Her creativity is pure genius. 


She is hosting a week just for Mom's this week in honor of Mother's Day, and my post is a DIY maternity dress for all the moms-to-be out there...because we're technically mother's too. :)

So head on over to Be Sweet and I'll show you how to make an easy peasy maternity dress for $5!!