Saturday, October 30, 2010

Superheros

Over a month ago, my sis in law asked me if I  would want to make Halloween costumes for her two girls. I love them to pieces, so of course I was thrilled to oblige. And I never blogged about it. But since it IS Halloween weekend, I figured I still could.

Their little brother is obsessed with superheroes. Not to be outdone, the girls chose their costumes accordingly. Wonderwoman & Pink Batgirl. Fabulous choices. Expensive choices if you are buying them. So my goal was to make them for less than $10 each. Here are their costumes of choice:


Images found here and here. (Superheroes obviously not to size.)

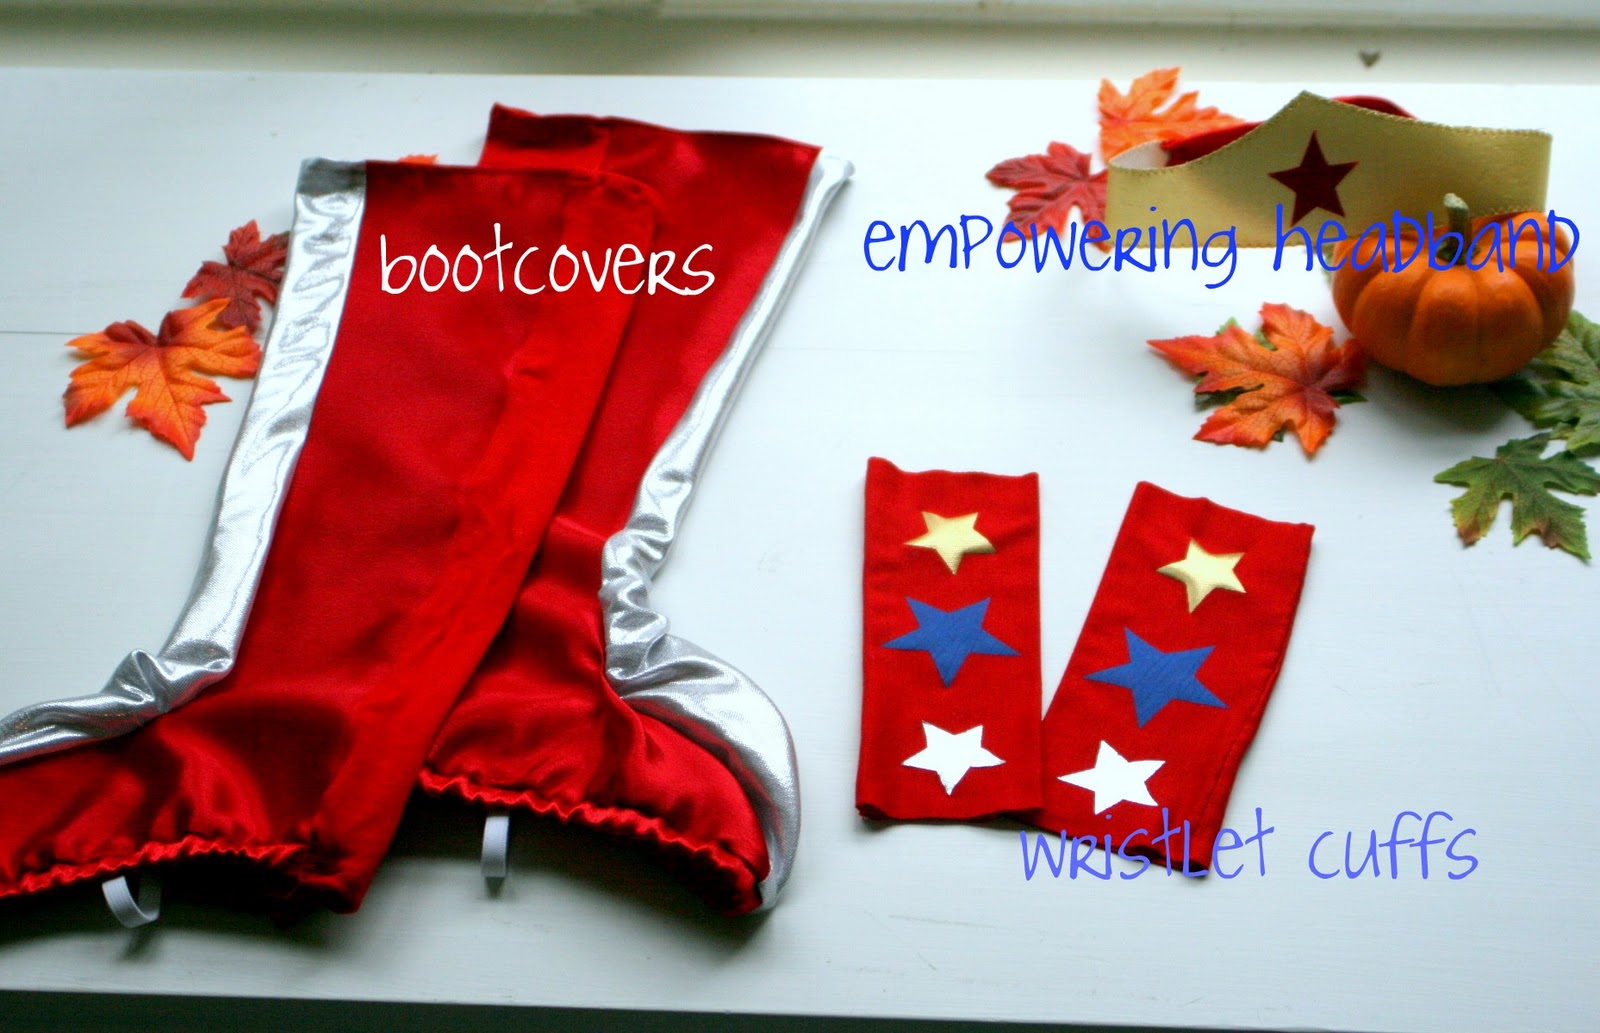
So here is what I came up with. 
There were a lot of little parts and pieces to each one. 
(And yes, I did add "fall" to some of the pictures...bare white was just not screaming Halloween!) 


(My first try at a t-shirt...was easier than I thought!)


And every super girl needs accessories...


Anyway...there you have it. I didn't use any patterns, so I kind of just made it all up as I went along. Apparently they were a hit. The day they arrived in the mail, batgirl refused to take hers off so she wore it to Walmart & received lots of compliments.

As for the price - almost all of the fabric I found on sale, or used coupons. I ended up spending less than $20 for both costumes! Not a bad deal.


I even had enough fabric left over to make matching trick or treat bags for them & their little brother...who is of course, also a superhero.


Have fun tomorrow, kids! 
Hopefully you wont be too busy saving the universe to pose for some pictures for me. 


Friday, October 29, 2010

New chairs and a song.

{I can't help but have this song running through my head as I type up this post. Read on, and you'll see why. :) }

The husband and I have THE oldest "dining" table & chairs ever. It's actually really a breakfast table. That I bought 10 years ago. At a yard sale. It's embarrassing to say the least. I'd show you a picture of it, but I'm ashamed. We are long overdue for an upgrade.

We went to a furniture store. G picked out a chair style he liked, and asked the saleswoman how much it would be. "$600", was her reply. "Oh, for all 6?" G asked. "No, $600 per chair." She replied again. I thought G was going to fall out of the overpriced chair from a heart attack. I picked him up off the floor and we left the store.

Ok...maybe I need to go another route if I ever want to dine in style.


So as I was wondering through my local thrift store the other day, I saw these babies....

I looked them over. And pondered. And deliberated. And ultimately I left the store. I wasn't thinking straight.

But then I started driving home...and couldn't stop thinking about them! They're just chairs, I know. But I loved their curvy lines, Frenchy look, and that I could add in some texture with fabric. They were sturdy, lovely ladies in hiding. I had to let them out. So I went back, and bought them up! 
$100 for all 5.

I brought these lovely ladies in waiting home. 

{I also found an upholstery remnant at Hancock Fabric for $3.50/yard. I brought home 3 yards. The fabric was wide enough, that one yard covered 2 chairs.}

A little sanding, and priming, and painting, 
and some new fabric staple gunned onto the seats...

And, hello gorgeous.

Love this fabric...and not just because it was on clearance. I just love how crisp it looks.

And look at those legs! She must work out.

Isn't she lovely? 
And at less than $25 per chair...even lovelier.

Now I'm off to find that perfect table.


I'm linking up to The Shabby Nest's Frugal Friday!

Wednesday, October 27, 2010

On the move...yes, again.

We move. A lot. I originally entitled my blog "The Slightly Nomadic Lives of D & G". I changed it because it was a bit long and not so catchy. Not because it lacked truth. Trust me, we are basically professional movers.

If you recall from this post, 3 months ago we moved 600 miles to Pennsylvania into a rental while waiting for our house to sell. No, we haven't sold our house. (Thank you recession!)
So why are we moving again would you ask?

Maybe it's because I fear for my life when opening the pots and pans cabinet...

And that I've ultimately given up the battle of trying to get the door to close...

Or because my only option for over the cabinet decorating is from Sams Club? (Don't you just love that hideous fluorescent light? Why they still insist on putting those in houses is beyond me!)


Or maybe because our wedding gifts are lonely out here in our storage closet, all sad & bored in their original packaging. (Doesn't that boxed up Kitchenaid make you just weep with pity?!)


It could be because our second bathroom bathtub is doubling as a closet. (Convenient if you need to wrap a gift while showering!)


And if I was tech savvy enough, I would upload a sound clip of the barking dog upstairs and her loud voiced owners. But alas, I am not, so you will have to take my word on that one. ;)

So yes...the pain of packing and unpacking is still fresh in my mind from the LAST move...but it will all be worth it for a bigger place, more storage and no unruly upstairs neighbors. I need a normal sized kitchen. I need organization. I need order. I need to give that beautiful new Kitchenaid a home on my counter.

It will still be a rental, but it will be home. No more barking dogs. Just G, me & the Kitchenaid.

Monday, October 25, 2010

Easy As Apple Pie

I've never been much of a baker. I love to cook, but baking is a tad too exact for me. I'm a little of this & a little of that kind of cook.

But this weekend G & I were at the farmer's market buying pumpkins, and while waiting in line next to the table of apples he decided we needed a bag. BIG bag. I had to do something. I'm too cheap thrifty to let those apples go to waste! So I rolled up my sleeves (not literally...it was a warm 72 degrees outside today!) and got to work.

But wait? How do you make an apple pie? I don't know. I've never made one before. But thanks to my bff google, now I do. I used this recipe for the crust & this recipe for the filling. 

And then this came out of the oven.

I asked my husband what he thought of my first apple pie attempt...
But he was too distracted to reply.

I guess I'll assume that's a win for the wifey. 

Thursday, October 21, 2010

The Everyday Princess Collection - Part I

My niece Annabelle might be the cutest little thing on the planet.

I call her Belly. A teeny little thing. BIG personality. A girly girl. She loves pink & princesses. My favorite thing about Christmas is buying her presents. Is that bad? (I'm kidding...kind of.) Don't tell her brothers.

Being a lover of all things Princesses myself, I decided I wanted to make her some princess dresses. I stumbled upon this princess dress up dress tutorial, from over at Crafterhours in my bloggy travels. What a great idea! A dress up dress using comfy knit fabrics. Except I wanted this to be an everyday dress. A school to playground to the grocery store to soccer practice dress. Because really...the point of clothes is to show them off.


So I streamlined the idea into what turned into this dress!

Forgive my terrible pictures...its hard to take pictures in our cave, err...apartment.


The construction was pretty easy. First, I found this Ringer Shirt tutorial, also from Crafterhours. I added to the bottom this Circle Skirt tutorial from Made. (Left out the elastic).

I had a lot of knit fabric leftover from when I made Halloween costumes for my other {equally as adorable} nieces (which I would link to, but still need to blog about...oops). So this was a next to no $ dress! I did buy the yellow knit. Which turned out to be pretty thin. To avoid an "I see London, I see France" playground singalong at sweet little Belly's expense, I decided to add a white knit layer underneath. Which conveniently, mens XL white undershirts work great! (Note to self...buy husband new undershirts for Christmas.)


Which Princess will be next?! 
I do have a yard of that yellow knit left...hmmmm....
Stay tuned!

A Housewarming Wreath

So one of my best friends, A & her husband, M from back in New Hampshire just bought their first home this month. I love them to PIECES so I was beyond happy for them. G & I were in town for a friends wedding last weekend, so I wanted to bring them a little something as a housewarming.

I knew I wanted to make her something, but was unsure of what - until I spotted this post on Michelle's blog over at Emerald Cove. I have been following her blog for a while, & I absolutely adore all of her beachy & creative decor. So I decided to steal, err...borrow...her twiggy wreath idea. I had to, it was a perfect idea!

Here's Michelle's wreath. 
Don't you wish you could reach through your computer screen & snatch one up for your wall? I do.
Hop on over to her blog to see the full post.

Here's what I started with...a grapevine wreath, faux berries, a scrap of burlap, a wooden "S" and a starfish.
M & A live near the beach (I know...this Central PA girl is TOTALLY jealous) so the starfish was the perfect touch.

A little hot glue later (ok, a lot of hot glue)...and we have a wreath!

I wish I had bought enough to make two...because now I want one!
Thanks Michelle for such a great idea!

Thursday, October 7, 2010

Houndstooth on the Mind

I don't know what it is...maybe fall? But lately I've become obsessed with houndstooth! Here are some of my favorite finds...

Love these cabbie hats, from hatcountry.com and Charlotte Russe
I absolutely LOVE flats, the flip flops of fall. I was thisclose to buying these flats from Payless today but wasn't sure I was sold on the patent leather toe. I kind of like the look of the Rampage pair better, from shoestation.com. What do you think?
Or for the rainy days, a rainboot alternative from Target! Love the side buckle...who knew rubber could look so chic?


If this coat from Bluefly.com wasn't sold out (and over $200!) it would totally be my go to coat for this winter. Sadly, I couldn't get a picture to copy. but you should check it out anyway. I LOVE the convertible collar and the big, black buttons.

How about a pair of cozy gloves from zappos.com? 

And how stinkin' adorable is this houndstooth necklace? I think I need one.

Houndstooth nails anyone? Ok...this is SO impressive, but might be a little overboard, even for me. :)


Happy Houndstoothing! 

Tuesday, September 28, 2010

Not-So-Bad for you Mac & Cheese

I had a craving the other day for Mac & Cheese. But...not really a craving for the oodles of calories & fat included since I'm trying to revamp G & I's meals. I spent some quality time with Google, & came across this recipe. I wish I had written down from where, but I totally didn't. 

This mac & cheese is not-so-bad for you because obviously there are better things to eat - but as mac & cheese go, it has minimal "naughty" foods in it. There are only 6 oz of cheese in it! The Gorgonzola gives you a lot more "bang for your buck" so to speak - a big, bold flavor of cheese, but using a lot less cheese than if you used traditional cheddar. The original recipe also called for mozzarella cheese, but I left it out because I don't like it. We didn't even miss it. But don't leave out the bay leaf, it gives deceivingly great flavor!

Ingredients:
1 tsp olive oil
1 cup finely chopped onion
2 tbsp flour
1 clove garlic
1 1/2 cup skim milk
1 bay leaf
2 oz (about 1/2 cup) Gorgonzola cheese
4 oz (about 3/4 cup)  Parmesan cheese - divided to 1/2 cup & 1/4 cup
1/4 tsp salt & pepper
8 oz (about 2 cup) wheat elbow macaroni
cooking spray
Panko bread crumbs for topping

Directions:
1. Heat oil over medium heat, cook chopped onion for 8 minutes.
2. Add flour & garlic, cook for 1 minute. (It will look very dry - add more oil if needed)
3. Stir in milk & bay leaf and bring mixture to a boil. Stir constantly with a whisk & cook for 2 minutes or until thick.
4. Add cheeses (1/2 cup of parm) and salt & pepper, stir until melted. Take out the bay leaf.
5. Add cooked macaroni to cheese mixture, stir until evenly coated. Add to your prepared casserole dish, top with 1/4 cup parm cheese & a handful of panko bread crumbs. (I also topped with paprika, but mainly for prettiness).
6. Bake at 350F for about 30 minutes or until heated.

I wish I had thought to take a picture the other day when I made this, because this was a pretty dish. I made it with Parmesan Sage Pork Chops from allrecipes. A great compliment.

Enjoy!

Tuesday, September 21, 2010

Welcome Miss Molly

My best friend since high school, Kristina, had her first baby girl the other day. I was beyond happy for her! I saw this idea on UCreate, and decided I just had to make one for her new baby girl. I added a monogram on the front for fun & extra cuteness.


It's like the 2nd cutest thing in the world. You're probably asking yourself what can be cuter than a ruffled butt onesie? Well, this baby obviously. Trust me, if you saw her you'd agree.

Chair Makeover

So I stumbled upon this beauty the other day at a local thrift store. What, beauty wouldn't be your choice word for it? Well, I thought this poor little chair had a little life left in it - just needed an uplift. So I bought it for $14!


So I'm pulling out of the parking lot, wondering what I'm going to do about a new cushion, when I see across the street a fabric store! One I didn't know our city even had! So I obviously went in & went straight to the clearance bin, and found some great blue-gray home decor fabric! 2 yards for $5! It was totally meant to be.

I brought the sad, tired chair home & sanded & spray painted it a pretty off white. Then I set out to remake the seat cushions. The foam inside the original cushions were surprisingly still foam-y, so I sprayed them with bleach to kill any germs that might have snuck through that fabulous mustard faux leather (I don't think the foam ever saw the light of day, but just in case?) and decided I would reuse them. Then I took apart the old cushion covers to make a pattern for my new covers. I then cut out the pieces to match.


I used off white piping to accent the seams. Below are a couple pictures of how I did it. It was pretty easy, I just sewed the piping inside of the seam, with the round piping part facing in towards the center of the cushion. You can also see that instead of a zipper, I used an overlap side. I am not brave enough to attempt zippers, yet.
The corners were a little tricky, but just sew slow and make sure you gather equally to make a neat corner.

And there! You're done with a pretty blue gray chair for only $19!

Perfect for our rental, where I don't want to spend a lot of $ furnishing a temporary space!