Monday, February 28, 2011

Aplique: A {Rainy Day} Tutorial

It's looking a little drab outside my window today...

Although in my craft room, things are looking a bit "springier"...

While my mom was visiting, she picked up these fabrics to make some spring outfits for my niece. She plans to make a couple pairs of capris, and I whipped up some appliquéd t-shirts for the tops.

A few weeks ago a friend asked me to post a tutorial about how I do appliqués, so I decided a rainy day was a perfect excuse to create a little step by step how to guide on my process. {I certainly did not invent this technique, so I am sure that there are lots and lots of tutorials, demos, instructions, etc. out there on the web for you all to choose from. This is just how I started doing it and what works for me!}


First, we're going to make the appliqué. 
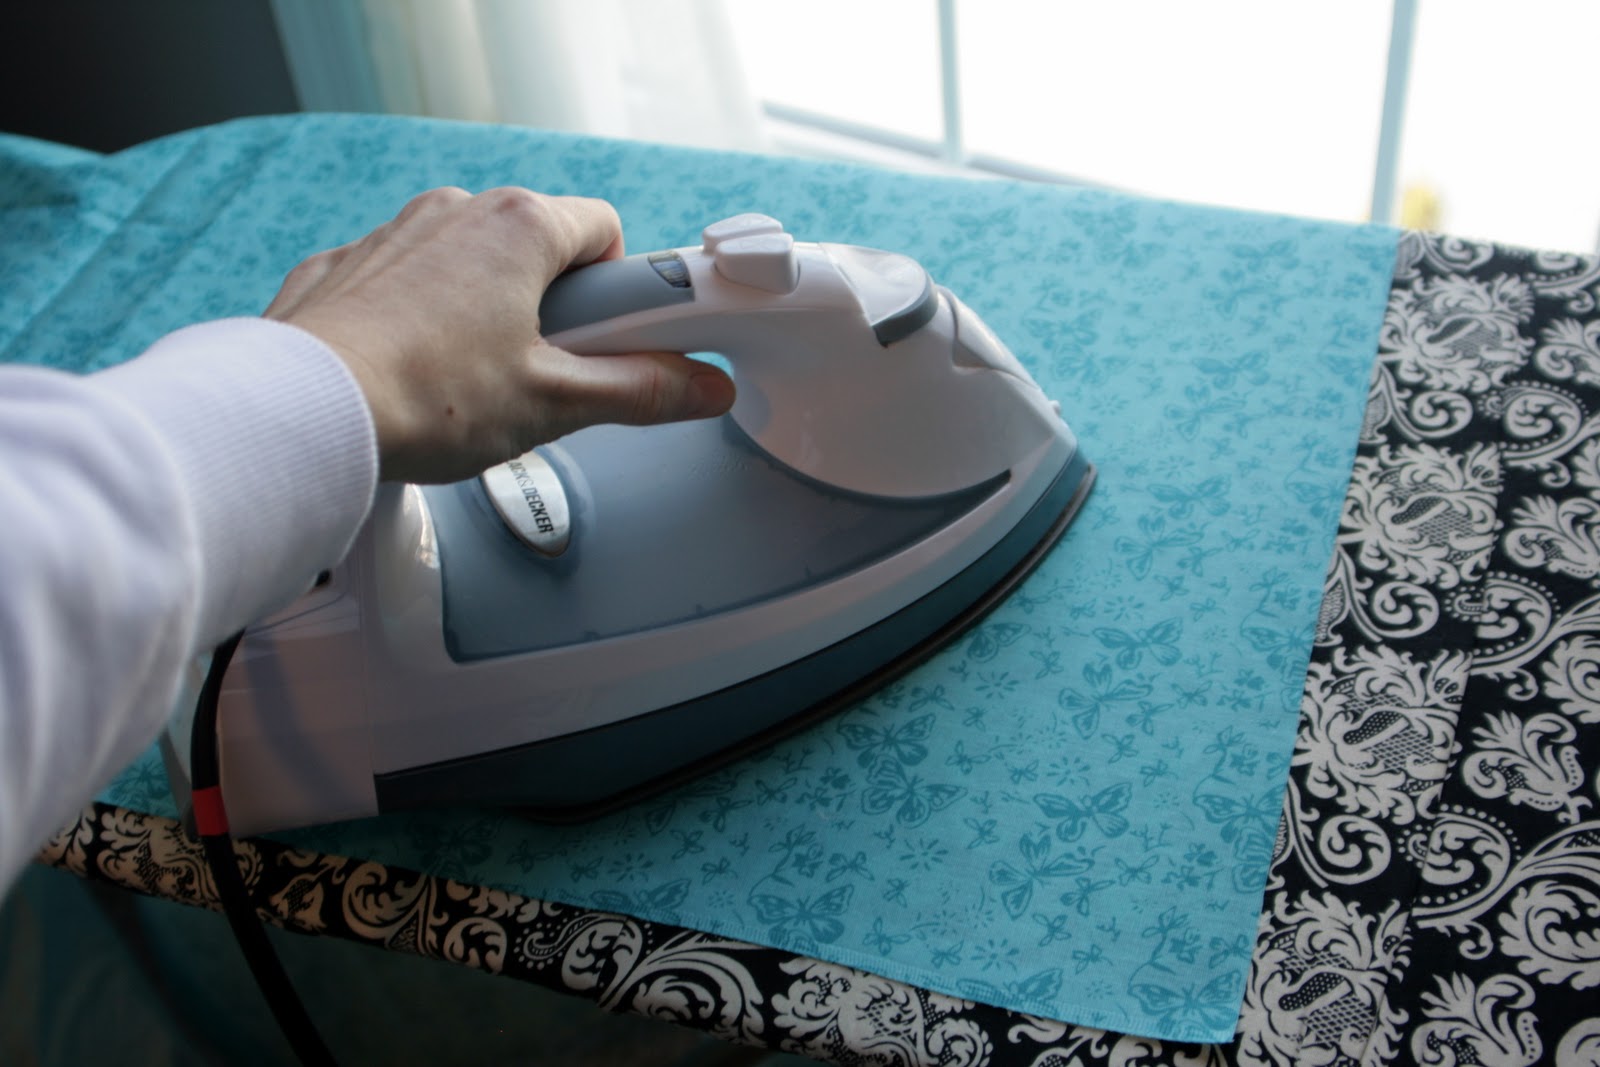
Start with your fabric. Iron any wrinkles out, you'll want a smooth surface.

Next you'll need some iron-on adhesive. This can be purchased at your fabric store, by the yard. One side will be textured and feel kind of plasticy, the otherside will have paper similar to waxed paper. There are a number of brands to choose from and any will work. Just make sure that it has adhesive on both sides (not just one side), and that it's sewable.

This is the brand that I buy. I like it because it's inexpensive ($1.99/yard) and it's fairly lightweight. A lighter weight adhesive will make the garment feel more wearable when you're done.
Now you need to decide on a shape or image. In this example, we're making a butterfly. You can certainly freehand your shape if you are a confident artist, but I am definitely not. So I like to use a stencil. {Check back tomorrow to see how I make quick and easy stencils!}

Take your stencil and place it over the adhesive paper. Cut out a piece of the paper big enough to fit your stencil.

Next, cut a piece of your fabric to the same size as the piece of adhesive paper you just cut. (Sorry...forgot a picture of these next steps. Bad blogger.)

Lay the cut piece of adhesive paper onto your ironing board, paper side down, plasticy side up. Place your cut piece of fabric, right side up on top of the adhesive paper. 

Iron together, on the highest heat setting your iron allows without steam. {Make sure to follow fabric care instructions for the fabric you're using!} Use pressure on your iron around the edges, to ensure that the adhesive sticks securely to your fabric. 

We now have our piece of fabric, with the paper "glued" to the back.

Next turn your fabric over, so it's right side down, paper side up. Place your stencil on the top, and trace around it with a pencil. Cut it out. {If you are using a directional print, make sure you keep in mind which direction you are placing the stencil for tracing. You can see that I have dive bombing butterflies below!}
You'll want to peel the paper off the back at this point. Hooray, our applique is complete and ready for the garment.

Next, grab your garment you want to put your appliqué on. In this case, we're using a $4.99 Target tee. Did I mention I love Target? I do.

You'll want to iron or press your t-shirt so that it is wrinkle free and ready for the appliqué. 
Next, place the appliqué on the t-shirt, wherever your heart desires. Today we're being original and putting it in the middle of the shirt.

Press into place, again using the highest heat setting your iron will allow without steam. Be sure to use extra pressure at the edges. You want the adhesive to be nice and "glued", as it will help stop fraying of the fabric.

Finally, we're going to sew the applique on. The iron-on adhesive is partially just a temporary hold to secure the applique on while you're sewing. If you skipped the sewing part, it would start to peel up after a bit of wearing. And on a squirmy five year old, we want to secure that puppy down!

So bring your t-shirt over to your sewing machine. 

Next, position the butterfly so that it's underneath your presser foot. On a small t-shirt like this, it will take some wrestling to get it adjusted. Make sure you only have ONE layer of t-shirt under the presser foot. Otherwise, you'll sew your shirt shut. (Not that I know from experience or anything...hahaha.)

Line the edge of the butterfly up with the middle line of your presser foot. The appliqué should be under the right side of the pressure foot, and only t-shirt should be under the left side. Does that make sense?
Using a zig-zag stictch, sew around the entire edge of your butterfly. On my machine, I set my stitch length and width both at "3".

Sew carefully so that the middle of your presser foot stays right on the edge of the appliqué. You will need to adjust the t-shirt frequently during this process.

When you find you need to adjust, make sure your needle is DOWN into the fabric, lift the presser foot, and adjust or pivot the fabric accordingly. Replace presser foot, and continue sewing. Repeat as necessary. I use my "hand sewing knob" frequently in this process. (I don't know the technical term, but its the dial on my machine that allows me to move my needle up and down myself, without using the foot pedal.)

Sorry, it's hard to take a picture of this process but the key is to always make sure that the middle of the presser foot is lined up with the edge of the appliqué...this will keep your stitching neat.

You can see how the zig zag is neatly along the edge of the butterfly, holding the edges of the appliqué down. 
Also, make sure to back stitch at the beginning and end. (I try to position the start and ending point at the least conspicuous place...if possible.)

Take your shirt back over to your ironing board. Press around the entire thing again, this time with steam. This just helps to secure your stitches and shrink your fabric back in place after any stretching that may have happened during sewing.
Congrats! Your appliquéd tee is finished!
But since this is a butterfly...I'll show you how I finished her off with a couple of cute antennae.

I freehanded my antennae using a erasable fabric marker.
Then, I hand stitched along the drawn line with an embroidery needle and embroidery floss. (Again, no picture. Bad blogger.)

Finally, I used a small piece of interfacing and ironed it onto the back, just under the embroidery. This will secure the stitches in place.
Turn your t-shirt right side out, and you're done! For real this time!

These t's will be a great compliment to the homemade capris' my mom plans to make!
But the fabric and shapes are endless and your imagination is the limit!
Happy Appliqué-ing! 

Tuesday, February 22, 2011

Traveling Office Box

The husband and I don't have a designated office space here in our house. With Baby G's nursery, a guest room & craft room, our two spare bedrooms are pretty maxed out. {Craft room space is non negotiable! :)}
So I created a traveling office box.

I picked up a fabric box at Home Depot for $5. Inside, I keep two accordian file folders and a desk organizer which holds our checkbooks, pens, post its, stamps and envelopes.
The folders hold all of our papers that I need to access regularly. There is a slot for unpaid bills, one for paid bills, insurance info, bank statements, etc. Greg and I each have a slot too. I even have slots for coupons and take out menus.
I love that when the mail comes, I can easily sort through it all, put it in the appropriate folder and know that our important documents are not going to get lost in the "shuffle." Sometimes if I'm in a hurry, I just throw the papers into this box to sort through at another time.

The file folders and desk organizer tuck perfectly inside.
I keep the box on the shelf in our laundry room. Out of the way, but easily accessible.
When it's time to pay bills, I can easily bring the box over to the table and know that I have everything that I need right in the box! {Anything to make paying bills easier!}  
If I need a document, it's right at my fingertips. The box has basically eliminated paper clutter in our home! 

If you're in need of some office organization and don't have a designated an office space...
create your own traveling office box and watch your mail and paper clutter 
{and maybe even a little stress!} 
disappear. 

Monday, February 21, 2011

Ode to the Chief

Happy Birthday, George...
...and Happy Presidents' Day, America!

Sunday, February 20, 2011

Visitors!

 If the posts slow to a stop this week, I apologize. My momma & step dad are here visiting for the week!

 I am always envious of people who have family who live close by. They live a good 11 hour drive away, so visits are few and far between. Needless to say, we have lots on the agenda, places to go, people to see, things to do!
My mom gave me this sign for Christmas last year...fitting? :) 

Hope everyone is enjoying their long weekend! We'll catch up soon. 

Wednesday, February 16, 2011

Hidden Tab Curtain: A Tutorial

This project all started with a design dilemma trifecta.

1. We have a small window in our master bath that looks across onto another townhouse. It has no blinds, so you find yourself thinking, "Hi neighbor!" every time you get out of the shower. Awkward!

2. The landlord left his curtains & rods up when he moved out. Which was nice! But the curtains were not my style and the rods were super-wide. I'm sure there is a technical term for them, but they are basically a flat metal strip that is about 3 inches wide. Have you ever tried to find a decent window covering that fits on a 3" rod? So impractical.

3. I'm cheap. Which I may have mentioned once or a few hundred times before. But I am. And I didn't want to spend big bucks on something to fit this uber-wide rod. {And I'm lazy. So I nor did I want to buy or install a new rod.}

(Ok, so that was 4 things...but trifecta really has such a fun ring to it. And I don't think "quadfecta" is a word.)

So I set out to solve my no blinds-wide rod-cheap wifey trifecta.

I dug through my box of window coverings, hoping that there was some sort of relief in there. I found some white sail cloth tab curtains that I bought for my office in my last house. They're from Target. The tabs seemed to be just the right height...hmmmm.
So I whipped up a hidden tab curtain panel!


It was a snap to whip up. Want to see how I did it? Of course you do.

Start with a regular tab top curtain.
I ironed all the tabs backwards against the back of the panel.
Then stitched the tabs to the panel. I just did a single line of stitching along the very bottom edge of each tab. (This way, I can undo the stitching later to restore the panel to its intended use if I so choose.)
Then I looped the tabs onto the curtain rod.
This is what your curtain panel will look like from the front. We've just created a hidden tab curtain!
I also made a pull back so that I could leave the panel open to let light into the bathroom during the day.

I made a simple tie back out of some scrap seer sucker. 
I attached two drapery rings to each end. (You can buy these for $5 a package at Target.)
Then I just tapped a small nail into the wall next to the window frame, and hung the loops onto it.
You could use a hook if you're concerned with appearances...but no one can really see this part. :)
And success!
The ugly metal rod is hidden, and we have a breezy, beachy curtain! {And some privacy. Hooray!}


Linking up to these fun parties this week:
Transformation Thursday at The Shabby Chic Cottage
Frugal Friday at The Shabby Nest

Tuesday, February 15, 2011

Happy {Belated} Valentine's!

Hope you all had a wonderful Valentine's yesterday! I had intentions of posting this post last night, but we ended up having a computer free night...which was lovely!

Valentine's at our house was simple but filled with love! {And smoke!}

My hubby greeted me at the door with these...


Instead of eating out, I cooked dinner...baked scallops & shrimp, gnocchi, & stuffed mushrooms. Yummm.

I thought I'd take a picture to show you how pretty our meal turned out to be, but the best laid plans....
As I was taking the seafood out of the oven, my hand slipped and I dumped half of it onto the oven floor. Should have taken a picture of that! We ate it anyway. And it was quite yummy. But not picture worthy.

For dessert I made molten chocolate lava cakes. Yummmmm again. 
These are sneaky little treats, that make your husband think you are a gourmet chef, but really, anyone can make them. I am NOT a baker, and these were a cinch for even me. I promise! Try them yourself! 
I used this recipe and served with sugared fresh raspberries and ice cream.

But I would recommend 
NOT spilling half of your dinner on the bottom of the oven 
before baking these, because we had a house full of smoke as I watched anxiously while the cakes were baking, hoping nothing erupted in flames! {It didn't. Phew.}

It certainly was a memorable night!
Not as smooth and romantic as I had envisioned, but it was still perfectly us! 
Hope your night was too!

Now I'm off to clean my oven. :)

Friday, February 11, 2011

A Minnie LBB Dress

I have two very exciting things to share in this post.
1. After living a life of deprivation for 29 years, I'll finally be making my first visit ever to Disneyworld in a few weeks! I've never been and I know, it's a crying shame. Greg and I are headed down for some fun in the sun with his sister & brother in law & their kiddos.

on to exciting thing #2...
2. My dear friend Amanda sent me a little present the other day. The Lil Blue Boo Sienna dress pattern. If you have never heard of LBB, you are living under a crafting rock. Sorry, but really...it's a great concept where the owner, Ashley takes thrifted tees and upcycles them into adorable attire for little girls. You can buy her Sienna dress & other patterns here.

So how are these two exciting things related?


I decided that I needed to try the pattern out, and what better way than to make our dress-loving-niece Alexa a Disney dress!

I wasn't sure exactly what kind of Disney dress I would make 
but when I found this vintage looking tee at Target for $3.00, 
I knew it had to be Minnie! 
She even has sparkles on her hat, dress & shoes. Adorable, right!

The dress was made to fit a size 6. The tee I bought was a girls XL, and ended up being the perfect width for the size 6 dress. Which meant no side seams. 

How perfect is that? 


I combined Minnie with a t-shirt & some extra fabric I had in my stash, and came up with this in the end:

The blue striped section on the bottom was the bottom of an adult shirt that happened to be the perfect size. Which is awesome because less work for me-no side seems or bottom to hem! I added the little rick-rack to the bottom edge to give it a little more whimsy. It looks a bit wonky in the picture, but I promise it looks better in real life.


If you haven't already ditched this post to buy your own LBB pattern, let me talk you into it a little more. The pattern was very easy to follow, lots of pictures, and great tips for sewing with knits without a serger! (Perfect for those, like me, that have serger envy.)

The fact that these dresses are mainly recycled is pretty awesome in itself. Being green sure makes me feel good! But add to that that I made this dress for $3, and you put this girl in the happiest place on earth.

Thursday, February 10, 2011

Valentine's Worthy Breakfast: Crepes

Last night my sweet husband offered to cook dinner. Which in our house always means one of two things...frozen pizza or breakfast for dinner. Luckily last night, breakfast won!

He whipped up a batch of crepes & I just had to share them because these were oh-so-yummy. The recipe is super simple & easy.
Throw all the ingredients into the Kitchenaid & mix away...


Pour onto a hot griddle & let hubby work his magic.
Greg likes his smothered with a whole lotta' this....
I like mine covered in a whole lotta' these...
 Add a dollop of whipped cream or Cool Whip and you'll swear you were eating dessert!

These would make a delicious Valentine's Day breakfast (or dinner!) Hint, hint hubby...

Tuesday, February 8, 2011

Baby G

Coming to the D & G household in August 2011....
Baby #1!

Greg and I are very excited to find out what this parenthood thing is all about...and now that the 1st trimester is over (starting tomorrow..but who's counting?), this Momma is very excited to start feeling like a normal person again! Although I'm told that the sheer exhaustion never does go away... :) 

So I guess it will come as no surprise that the D & G blog might become a little cluttered with baby projects in the next few months. I have a 3 mile long list of book marked projects I want to tackle. Is it possible to overdose on itty bitty adorable craftiness? I sure hope not...because if so, I'm screwed!

Friday, February 4, 2011

Icy Day Crafts: Baby Boy Welcome Gift

Ice, ice baby.
Earlier this week when the rest of the country was getting snow, we were getting covered in ice!

Luckily, I had planned ahead and stocked up on the essentials to make it through the storm! I'm not talking milk & eggs here people.
I took full advantage of the excuse to stay inside & craft.

One of my dear friends had her second baby a few weeks ago. A baby boy. And get this...as she & her hubby were about to head to the hospital, baby had other plans and she ended up delivering the baby at HOME! Such a brave Momma & Dad. It's a great story. I wanted to make a little gift to send her way to welcome Baby Jack to their family.
I made Baby Jack and his big sister Ellie some appliqued shirts. 
A bright blue & green flannel for big sis...a brown & blue houndstooth flannel for the lil' bro. 
(A two-for! Selfishly fullfilling my love of houndstooth.)

For days when baby is feeling extra handsome...

And a matching "lovey" for baby.
I wish I had made one in my size! 
I made this with the houndstooth flannel on one side and a super-soft-fuzzy-white fabric on the other. (Technical fabric term.) Fair warning: when you cut this fabric, it will look like it's snowing in your craft room. You will look like the abominable snowman. I don't think the woman at the cutting table at the craft store will ever recover! (Have a lint roller handy.)
Anyway...
Welcome Baby Jack! I can't wait to meet you. 
(And to Jack's Momma...if you're reading this, act surprised. :-) I couldn't wait to post these!)