Showing posts with label wedding. Show all posts

Monday, August 23, 2010

A Wedding to Remember

A lot goes into planning a wedding. This I now know. I wasn't really expecting anything else...I'm a sucker for details. My design belief is that when someone walks into your event or party or even home, you want them to look around and think - WOW! Without really being able to tell you why. 

We got married on the coast of Maine - possibly my favorite place in the world to be. I didn't want a theme wedding with shells or anchors or boats or starfish or lobsters or sand dollars...I wanted it to be subtle. So that people would kind of think oceany - but not feel smacked in the face. 

Nearly everything in our wedding was handmade. I wouldn't have wanted it any other way. My angel mother is to thank for just about everything that went into the day. 

Our table scape...seer sucker runners, light & airy babies breath center pieces, white linens, lots of candle light.

Homemade strawberry Jam - made by Mom. I ordered the stickers on the top from Etsy.

Programs which I made - they are actually stitched together. I loved this detail so much!


The escort cards I made with the left over paper from the invitations for $0!

Flowergirl dresses - my mom made all 4! They couldn't have been more perfect. And how stinkin' adorable are these nieces of ours?


And here is one of my beautiful bridesmaids - the pink shoes were totally their idea - but I looooved that they chose to do it!


And last but not least - my sweet groom & I. Doesn't he look so handsome in his dress blues? I'm so thrilled he went along with that idea. And this is a shot of the veil that my mom made for me - and I sewed 18 feet of beading along the edge. A labor of love - literally!


So there's a taste of our sun shined filled wedding by the ocean in Maine. It turned out more beautiful than I had imagined! Now, if I can figure out how to do it all over again...siiigh. 


Oh - like the pics? Check out www.gwynethcolleen.com & www.kristinaobrien.com for more!
Sunday, May 2, 2010

Pillow love

Do you have any idea how much a ring bearer pillow costs these days? For anything remotely interesting, it's upwards of $60! Absurd, I know. And clearly I am not willing to pay a dime for something that I think I can do myself. So I whipped up this little cutie this weekend for a total cost of about $3.

Ruffles, as delicious and intricate that they appear, are super easy to make. There are a hundred tutorials about how to do them, so I'll assume you all know how to Google & be brief. But basically you sew a single stitch down a long piece of fabric. Then, holding one end of the thread (only the top stitch side, not both) you scrunch down the fabric.

I whipped up 5 rows of ruffles & pinned them onto my pillow fabric.

Then, sew your ruffles on. I love little details, so I decided to use contrasting thread (navy thread, pink fabric) This made it nearly impossible to sew them on with the machine without two lines of thread showing; so I sewed mine on by hand. If you use the same color thread as the fabric, I think machine sewing would look fine. Then, just sew together, stuff, done. I also tacked a ribbon on the top of mine, you know...to tie those ever important fake rings to. (2 year olds should never be in charge of fine jewelry.)
My cutie pitutie nephew-to-be Brycie will be carrying this down the aisle...lets hope he's feeling in touch with his feminine side that day!

Tuesday, April 27, 2010

No turning back now!


The moment I have been waiting for has arrived. The three magical words every DIY bride wants to hear. After weeks of research, designing, printing, cuting, gluing, stamping (& of course, bedazzling), the invitations are...wait for it...IN THE MAIL!

I have to say that even though I significantly underestimated the time it took to me to put 80 invitations together from scratch, I loved that I handmade each one. As cheesy as it sounds, as I did my final "quality control check" (as G called it) & placed each one in its envelope, I couldn't help but feel like I was sending something extra to all of our guests. Something you can't buy in a store. And that's what I hope our wedding turns out to be; handmade, and something that couldn't possibly be bought in a store.

On a lighter note: Nothing says "there's no turning back now" than inviting 150 people to watch you get married. (Grin)

Sunday, March 21, 2010

Flower Tees

Boy do I have some spoiled flower girls. :) So I love the image of our four little adorable nieces getting ready the morning of the wedding wearing matching tees. So I made them some.

First, I made these adorable "no sew fabric flowers" from a tutorial I got from this post over on a great craft blog, Samster Mommy. I followed the instructions pretty much exactly, except adding more tulle! (Can you really ever have too much tulle?) The materials to make all 4 (with lots left over) cost me about $2, and I love how they came out:
Second, I picked up some Old Navy Tee's I snagged on sale for $4 each. I also picked up some rhinestone iron on "flower girl" letters for $1 each at AC Moore. As good as the deal was, I realized quickly why they were so cheap. I basically had to glue each rhinestone individually onto the shirts because the adhesive wasn't sticking. So it took me longer than I thought, but for about $5.50 per shirt, I rather like the result...


Friday, February 26, 2010

Wedding shoe perfection...almost

So I have had a vision of my wedding shoes since before G proposed (I had high hopes for you babe..wink). I mean, the shoes have always been more important to me than the dress. Seriously.  My perfection shoe vision has always included hot pink, which I perhaps not-so-coincidentally chose as one of our colors. My vision was working out quite nicely. Until I my first google search, after which I realized quite quickly that it was going to be more than an afternoon with the laptap to find a pair other than something resembling stripper shoes. But tonight I found these beauties (here):
The heavens opened up and I think I actually heard a little chorus of hallelujah playing over my head. They fit my vision to a T! (T strap? Ok..terrible pun.) If only I wasn't an amazon. (FYI, in Dani lingo amazon = being 5foot9inches tall). However, it is now my new quest to craft myself a pair similar out of less high strappy heals. Wish me luck, blog followers! And if you get any leads on pink strappy sub 3 inch heels, please send them my way.

Thursday, February 25, 2010

Buttons, beads and bows

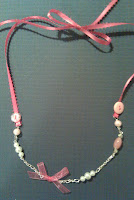
So all my blog stalking lately has got me inspired to get in touch with my crafty side. And with a wedding in July (basically the only thing on my mind) it was a no brainer. Between G and I we have 4 adorable nieces as our flower girls, and I wanted to give them some jewelry to wear in the wedding. I am mildly obsessed with the JCrew Pearl & Ribbon necklaces and decided to use it as my inspiration. (I saw a grown up version done on a blog last night, but in my sleepy late night state, I can't remember where...)

Anyway, after an attempted-quick-but-turned into not-so-quick stop at the craft store, this is what I came up with...

They were actually pretty easy to make, and at about $3, cheap! And every bride to be can appreciate that. I wanted to personalize each one, and initials were out (they all have names starting with A), so I settled on the name beads, which I loved in the end. The buttons were my craft store "eureka!" moment, but I love how they add a little whimsy. I also like the ribbon tie instead of a clasp...adjustable to a perfect fit, and soft and less scratchy on little ones skin. One down, three more to go!