Showing posts with label crafts. Show all posts

Tuesday, May 10, 2011

Flip Flop Party Favors

Moving right along with birthdays...our niece Alexa is hosting her 6th birthday party this weekend! She chose to have a "flip flop" themed party. First of all, how cute is that? I love it. Her mama recruited me to make some party favors for the lucky little girls attending.
I started with Old Navy flip flops in pink & purple. A steal at $2.50 per pair.
I made the bows out of ribbon...a purple or pink polka dot bow and a "flip flop" printed ribbon bow on top. 
The entire bow is held together with a thin ribbon tied through a button. And a bit of hot glue for reinforcement.
I glued the bows onto the flip flops with GOOP, and held them down with clips during drying. They seemed to be pretty firmly attached when they were dry.
We'll see how well they hold up to a group of dancing, twirling, partying 6 year olds!

Thursday, April 7, 2011

Project In Progress

Here's a sneak peak at what I've been working on this week...
Do you ever have a project that takes over your house? This is slowly becoming one of those projects! My poor husband! I'm a big fan of a "big reveal", so I wont tell you what it is...but I will tell you that it's a project for Baby G's nursery that I'm super excited about! I am hoping to finish by this weekend...so check back soon!
In the meantime...any guesses?!

Wednesday, February 2, 2011

Felt Rosette Wreath

This was a Christmas present that I made for my Mom, but would make a super cute Valentines Day wreath!
Start with a $4.00 grapevine wreathe. Then make about a bajillion felt rosettes. Ok, not that many, but I did use probably 30 or so. I used all white roses and I also cut a few leaves out of green felt. Felt at my craft store was on sale, so I spent about $1.00 on all the felt!

These little buggers aren't hard to make, but here is an excellent tutorial from another blog, Mrs Priss, to get you started.
Then just hot glue em on wherever your little heart desires.

Finally, I added a piece of burlap at the top & a cream ribbon tied in a bow to hang it on the wall with.


Use red and pink felt for a super cute Valentines Day wreath! Or pastels for Easter! Or whatever your little heart desires. At less than $5.00 per wreath...make one per holiday!

Wednesday, January 12, 2011

Wall worthy bulletin board

I have newly discovered how much I love a clean looking fridge. Since we moved into our rental home, I hadn't put anything on our fridge - no magnets, pictures, papers. Nothing. And I like it. A lot. It really makes the kitchen look cleaner. And oh how I love when things are clean.

So where to put all that "stuff" that used to be on the fridge? How about a small bulletin board to put up in our laundry area, which is just off the kitchen. Being in a rental, I am really trying not to buy anything to fit this space...since we plan to buy a more permanent home in the next year. So I went "shopping" around my house for ideas.


I had this frame, which the glass had broken out of years ago. For some reason I kept it through our million moves. (So unlike me!) But it was the perfect frame to upcycle into a bulletin board...

I also found a package of cork tiles, which I bought a few months ago at the craft store for $3.97. I can't remember why I bought them now...but at less than $4, who cares!

I took the cardboard out of the frame to use as a guide, and placed it over 2 of the tiles. I tried to make the seam of the tiles centered in the middle...

I wanted to hide the seam, so I wrapped a piece of ribbon around the tiles where the seam was, and hot glued it in place on the back. To even it out, I repeated the ribbon a third towards the top and the bottom of the frame.

Now just put it all back together!

Add some homemade felt roses & some cuuute kiddos...and you have a {super cheap} wall worthy bulletin board! (And a clean fridge!)

Linking to Blue Cricket Design for a Show & Tell Wednesday Link Party!

Sunday, December 12, 2010

Gingerbread Extravaganza!

Every year my amazing mother hosts a gingerbread decorating day. She spends hours and hours baking, cutting out, and putting together a gingerbread house (or in many cases, something other than a house) for everyone, and we all decorate them together. Kids and adults big kids alike! It's one of my favorite days of the year, and I was so lucky to have been "home" for it this year!
This year she let everyone choose their "structure," so we had a big variety. And we aren't talking tiny houses here people. Let's just say my mother has a problem with the scale of these structures. (Note: a castle so large my niece could have probably climbed inside if she wanted.) 

What I love most about this day, is the creativity & imagination the kids display. It's refreshing & fun to watch them create with such concentration & concern.

the transformation...
is always magnificent!

A barn...

a farmhouse...

an 18 wheeler...

a train...

and a castle fit for a princess...


A day full of family, candy, & Christmasy fun...doesn't get much better than that!

Saturday, October 30, 2010

Superheros

Over a month ago, my sis in law asked me if I  would want to make Halloween costumes for her two girls. I love them to pieces, so of course I was thrilled to oblige. And I never blogged about it. But since it IS Halloween weekend, I figured I still could.

Their little brother is obsessed with superheroes. Not to be outdone, the girls chose their costumes accordingly. Wonderwoman & Pink Batgirl. Fabulous choices. Expensive choices if you are buying them. So my goal was to make them for less than $10 each. Here are their costumes of choice:


Images found here and here. (Superheroes obviously not to size.)

So here is what I came up with. 
There were a lot of little parts and pieces to each one. 
(And yes, I did add "fall" to some of the pictures...bare white was just not screaming Halloween!) 


(My first try at a t-shirt...was easier than I thought!)


And every super girl needs accessories...


Anyway...there you have it. I didn't use any patterns, so I kind of just made it all up as I went along. Apparently they were a hit. The day they arrived in the mail, batgirl refused to take hers off so she wore it to Walmart & received lots of compliments.

As for the price - almost all of the fabric I found on sale, or used coupons. I ended up spending less than $20 for both costumes! Not a bad deal.


I even had enough fabric left over to make matching trick or treat bags for them & their little brother...who is of course, also a superhero.


Have fun tomorrow, kids! 
Hopefully you wont be too busy saving the universe to pose for some pictures for me. 


Thursday, October 21, 2010

The Everyday Princess Collection - Part I

My niece Annabelle might be the cutest little thing on the planet.

I call her Belly. A teeny little thing. BIG personality. A girly girl. She loves pink & princesses. My favorite thing about Christmas is buying her presents. Is that bad? (I'm kidding...kind of.) Don't tell her brothers.

Being a lover of all things Princesses myself, I decided I wanted to make her some princess dresses. I stumbled upon this princess dress up dress tutorial, from over at Crafterhours in my bloggy travels. What a great idea! A dress up dress using comfy knit fabrics. Except I wanted this to be an everyday dress. A school to playground to the grocery store to soccer practice dress. Because really...the point of clothes is to show them off.


So I streamlined the idea into what turned into this dress!

Forgive my terrible pictures...its hard to take pictures in our cave, err...apartment.


The construction was pretty easy. First, I found this Ringer Shirt tutorial, also from Crafterhours. I added to the bottom this Circle Skirt tutorial from Made. (Left out the elastic).

I had a lot of knit fabric leftover from when I made Halloween costumes for my other {equally as adorable} nieces (which I would link to, but still need to blog about...oops). So this was a next to no $ dress! I did buy the yellow knit. Which turned out to be pretty thin. To avoid an "I see London, I see France" playground singalong at sweet little Belly's expense, I decided to add a white knit layer underneath. Which conveniently, mens XL white undershirts work great! (Note to self...buy husband new undershirts for Christmas.)


Which Princess will be next?! 
I do have a yard of that yellow knit left...hmmmm....
Stay tuned!

A Housewarming Wreath

So one of my best friends, A & her husband, M from back in New Hampshire just bought their first home this month. I love them to PIECES so I was beyond happy for them. G & I were in town for a friends wedding last weekend, so I wanted to bring them a little something as a housewarming.

I knew I wanted to make her something, but was unsure of what - until I spotted this post on Michelle's blog over at Emerald Cove. I have been following her blog for a while, & I absolutely adore all of her beachy & creative decor. So I decided to steal, err...borrow...her twiggy wreath idea. I had to, it was a perfect idea!

Here's Michelle's wreath. 
Don't you wish you could reach through your computer screen & snatch one up for your wall? I do.
Hop on over to her blog to see the full post.

Here's what I started with...a grapevine wreath, faux berries, a scrap of burlap, a wooden "S" and a starfish.
M & A live near the beach (I know...this Central PA girl is TOTALLY jealous) so the starfish was the perfect touch.

A little hot glue later (ok, a lot of hot glue)...and we have a wreath!

I wish I had bought enough to make two...because now I want one!
Thanks Michelle for such a great idea!

Tuesday, September 21, 2010

Welcome Miss Molly

My best friend since high school, Kristina, had her first baby girl the other day. I was beyond happy for her! I saw this idea on UCreate, and decided I just had to make one for her new baby girl. I added a monogram on the front for fun & extra cuteness.


It's like the 2nd cutest thing in the world. You're probably asking yourself what can be cuter than a ruffled butt onesie? Well, this baby obviously. Trust me, if you saw her you'd agree.

Chair Makeover

So I stumbled upon this beauty the other day at a local thrift store. What, beauty wouldn't be your choice word for it? Well, I thought this poor little chair had a little life left in it - just needed an uplift. So I bought it for $14!


So I'm pulling out of the parking lot, wondering what I'm going to do about a new cushion, when I see across the street a fabric store! One I didn't know our city even had! So I obviously went in & went straight to the clearance bin, and found some great blue-gray home decor fabric! 2 yards for $5! It was totally meant to be.

I brought the sad, tired chair home & sanded & spray painted it a pretty off white. Then I set out to remake the seat cushions. The foam inside the original cushions were surprisingly still foam-y, so I sprayed them with bleach to kill any germs that might have snuck through that fabulous mustard faux leather (I don't think the foam ever saw the light of day, but just in case?) and decided I would reuse them. Then I took apart the old cushion covers to make a pattern for my new covers. I then cut out the pieces to match.


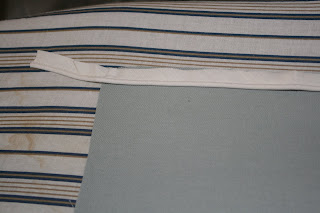
I used off white piping to accent the seams. Below are a couple pictures of how I did it. It was pretty easy, I just sewed the piping inside of the seam, with the round piping part facing in towards the center of the cushion. You can also see that instead of a zipper, I used an overlap side. I am not brave enough to attempt zippers, yet.
The corners were a little tricky, but just sew slow and make sure you gather equally to make a neat corner.

And there! You're done with a pretty blue gray chair for only $19!

Perfect for our rental, where I don't want to spend a lot of $ furnishing a temporary space!