Cricket....cricket....
Yes, I know...my first post in weeks! What can I say, sometimes life just gets in the way. But I have exciting news. We're MOVING! Again. Yes, again. This will be our 3rd move in the last year. No, we are not nomads, or gypsy travelers, or convicts on the run. (Although at times I feel this way!) It's just the way the cookie crumbles.
Job transfers, job offers, and apartment changes were the culprits of most of these moves. But yesterday we closed on our new house here in PA!
I'd like to say we are staying put for awhile...because I absolutely love this house.
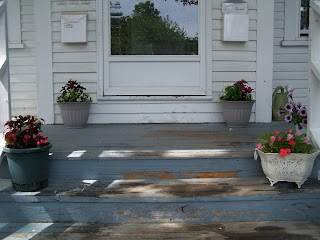
I can't wait to get my DIY hands on it! It is only 2 years old, so there isn't too much to be done, but every wall is white, a total blank canvas! And you can see from the pic...some serious gardening needs to be done! I can't wait to paint, organize, decorate, and set up our Nursery for Baby G. But most of all I can't wait to let the dust settle...to unpack for "good" and to call this house a home as we start our new family of three.
Needless to say, the sewing and crafting might be put on hold for a while, but you can expect a lot of decorating posts to come!!
Showing posts with label at home. Show all posts
Showing posts with label at home. Show all posts
Friday, July 1, 2011
Monday, March 14, 2011
Simple Solutions: A Large Area Rug on the Cheap
Our master bedroom here in our rental has beautiful hardwood floors. This I love. But I didn't love how cold the floors were on my bare feet in the morning. We needed an area rug to go underneath our bed.
I decided I wanted something roughly 10x12 feet so that it would fit under the bed and have a nice overhang on either side. There was just one problem. Area rugs this large are not cheap! And not to sound like a broken record, but when furnishing a temporary space...cheap inexpensive is the answer to every problem.
So when walking through Home Depot, I spotted a bin of 6x9' shag area rugs for $29.99 each. They weren't the highest of quality, but really, who could pass up such a deal?
I decided I wanted something roughly 10x12 feet so that it would fit under the bed and have a nice overhang on either side. There was just one problem. Area rugs this large are not cheap! And not to sound like a broken record, but when furnishing a temporary space...
So when walking through Home Depot, I spotted a bin of 6x9' shag area rugs for $29.99 each. They weren't the highest of quality, but really, who could pass up such a deal?
So we bought two, brought them home and duct taped them together!
You can hardly even see the seam in the middle, since it's basically hidden underneath the bed.
So for $60, we have a 9x12' area rug that does a great job of keeping my toes nice & toasty in the morning.
A simple solution to what could have been an expensive problem.
Tuesday, February 22, 2011
Traveling Office Box
The husband and I don't have a designated office space here in our house. With Baby G's nursery, a guest room & craft room, our two spare bedrooms are pretty maxed out. {Craft room space is non negotiable! :)}
So I created a traveling office box.
I picked up a fabric box at Home Depot for $5. Inside, I keep two accordian file folders and a desk organizer which holds our checkbooks, pens, post its, stamps and envelopes.
The folders hold all of our papers that I need to access regularly. There is a slot for unpaid bills, one for paid bills, insurance info, bank statements, etc. Greg and I each have a slot too. I even have slots for coupons and take out menus.
I love that when the mail comes, I can easily sort through it all, put it in the appropriate folder and know that our important documents are not going to get lost in the "shuffle." Sometimes if I'm in a hurry, I just throw the papers into this box to sort through at another time.
The file folders and desk organizer tuck perfectly inside.
I keep the box on the shelf in our laundry room. Out of the way, but easily accessible.
When it's time to pay bills, I can easily bring the box over to the table and know that I have everything that I need right in the box! {Anything to make paying bills easier!}
If I need a document, it's right at my fingertips. The box has basically eliminated paper clutter in our home!
If you're in need of some office organization and don't have a designated an office space...
create your own traveling office box and watch your mail and paper clutter
{and maybe even a little stress!}
disappear.
Wednesday, February 16, 2011
Hidden Tab Curtain: A Tutorial
This project all started with a design dilemma trifecta.
1. We have a small window in our master bath that looks across onto another townhouse. It has no blinds, so you find yourself thinking, "Hi neighbor!" every time you get out of the shower. Awkward!
2. The landlord left his curtains & rods up when he moved out. Which was nice! But the curtains were not my style and the rods were super-wide. I'm sure there is a technical term for them, but they are basically a flat metal strip that is about 3 inches wide. Have you ever tried to find a decent window covering that fits on a 3" rod? So impractical.
3. I'm cheap. Which I may have mentioned once or a few hundred times before. But I am. And I didn't want to spend big bucks on something to fit this uber-wide rod. {And I'm lazy. So I nor did I want to buy or install a new rod.}
So I set out to solve my no blinds-wide rod-cheap wifey trifecta.
I dug through my box of window coverings, hoping that there was some sort of relief in there. I found some white sail cloth tab curtains that I bought for my office in my last house. They're from Target. The tabs seemed to be just the right height...hmmmm.
Start with a regular tab top curtain.
I ironed all the tabs backwards against the back of the panel.
Then stitched the tabs to the panel. I just did a single line of stitching along the very bottom edge of each tab. (This way, I can undo the stitching later to restore the panel to its intended use if I so choose.)
Then I looped the tabs onto the curtain rod.
This is what your curtain panel will look like from the front. We've just created a hidden tab curtain!
1. We have a small window in our master bath that looks across onto another townhouse. It has no blinds, so you find yourself thinking, "Hi neighbor!" every time you get out of the shower. Awkward!
2. The landlord left his curtains & rods up when he moved out. Which was nice! But the curtains were not my style and the rods were super-wide. I'm sure there is a technical term for them, but they are basically a flat metal strip that is about 3 inches wide. Have you ever tried to find a decent window covering that fits on a 3" rod? So impractical.
3. I'm cheap. Which I may have mentioned once or a few hundred times before. But I am. And I didn't want to spend big bucks on something to fit this uber-wide rod. {And I'm lazy. So I nor did I want to buy or install a new rod.}
(Ok, so that was 4 things...but trifecta really has such a fun ring to it. And I don't think "quadfecta" is a word.)
So I set out to solve my no blinds-wide rod-cheap wifey trifecta.
So I whipped up a hidden tab curtain panel!
It was a snap to whip up. Want to see how I did it? Of course you do.
Start with a regular tab top curtain.
I ironed all the tabs backwards against the back of the panel.
Then stitched the tabs to the panel. I just did a single line of stitching along the very bottom edge of each tab. (This way, I can undo the stitching later to restore the panel to its intended use if I so choose.)
I also made a pull back so that I could leave the panel open to let light into the bathroom during the day.
I made a simple tie back out of some scrap seer sucker.
I attached two drapery rings to each end. (You can buy these for $5 a package at Target.)
Then I just tapped a small nail into the wall next to the window frame, and hung the loops onto it.
You could use a hook if you're concerned with appearances...but no one can really see this part. :)
And success!
The ugly metal rod is hidden, and we have a breezy, beachy curtain! {And some privacy. Hooray!}
Linking up to these fun parties this week:
Transformation Thursday at The Shabby Chic Cottage
Frugal Friday at The Shabby Nest
Tuesday, February 1, 2011
A Tribute :)
In 2009 Greg and I bought our first home together. Maybe I should say we rescued it. I loved this house the moment I saw it online. It was in desperate need of repair. I begged Greg that we needed it. It needed us! He finally agreed, and we rescued it from despair. We (and my dear mom & step dad) changed just about everything in the house - flooring, paint, fixtures, bathrooms.
In the end, it was truly ours. And oh, I loved this house.
This was my favorite room in the house. The kitchen. (The furniture is outdated and was not my first choice...but home repairs left little money for furniture upgrades!) Regardless, walking into this room felt like getting a big hug. Not to mention, 7 days after our closing, we hosted Thanksgiving for our families and Greg proposed to me in this very spot.
Yesterday was our closing on this house. After an unexpected (but welcomed) job offer for Greg, we had to move on. So yesterday, we signed it away. But we're onto bigger and better things, and new adventures, and {hopefully soon} new house hunting. I just felt the need to pay a small tribute to the pretty blue house on Surrey Lane that I loved so much.
"It always amazes me to think that every house on every street is full of so many stories; so many triumphs and tragedies, and all we see are yards and driveways." Glenn Close
Wednesday, January 12, 2011
Wall worthy bulletin board
I have newly discovered how much I love a clean looking fridge. Since we moved into our rental home, I hadn't put anything on our fridge - no magnets, pictures, papers. Nothing. And I like it. A lot. It really makes the kitchen look cleaner. And oh how I love when things are clean.
So where to put all that "stuff" that used to be on the fridge? How about a small bulletin board to put up in our laundry area, which is just off the kitchen. Being in a rental, I am really trying not to buy anything to fit this space...since we plan to buy a more permanent home in the next year. So I went "shopping" around my house for ideas.
I had this frame, which the glass had broken out of years ago. For some reason I kept it through our million moves. (So unlike me!) But it was the perfect frame to upcycle into a bulletin board...
I also found a package of cork tiles, which I bought a few months ago at the craft store for $3.97. I can't remember why I bought them now...but at less than $4, who cares!
I took the cardboard out of the frame to use as a guide, and placed it over 2 of the tiles. I tried to make the seam of the tiles centered in the middle...
I wanted to hide the seam, so I wrapped a piece of ribbon around the tiles where the seam was, and hot glued it in place on the back. To even it out, I repeated the ribbon a third towards the top and the bottom of the frame.
Now just put it all back together!
Add some homemade felt roses & some cuuute kiddos...and you have a {super cheap} wall worthy bulletin board! (And a clean fridge!)
Tuesday, September 21, 2010
Chair Makeover
 So I stumbled upon this beauty the other day at a local thrift store. What, beauty wouldn't be your choice word for it? Well, I thought this poor little chair had a little life left in it - just needed an uplift. So I bought it for $14!
So I'm pulling out of the parking lot, wondering what I'm going to do about a new cushion, when I see across the street a fabric store! One I didn't know our city even had! So I obviously went in & went straight to the clearance bin, and found some great blue-gray home decor fabric! 2 yards for $5! It was totally meant to be.
I brought the sad, tired chair home & sanded & spray painted it a pretty off white. Then I set out to remake the seat cushions. The foam inside the original cushions were surprisingly still foam-y, so I sprayed them with bleach to kill any germs that might have snuck through that fabulous mustard faux leather (I don't think the foam ever saw the light of day, but just in case?) and decided I would reuse them. Then I took apart the old cushion covers to make a pattern for my new covers. I then cut out the pieces to match.

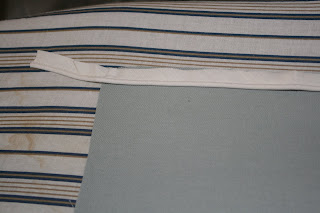
I used off white piping to accent the seams. Below are a couple pictures of how I did it. It was pretty easy, I just sewed the piping inside of the seam, with the round piping part facing in towards the center of the cushion. You can also see that instead of a zipper, I used an overlap side. I am not brave enough to attempt zippers, yet.
The corners were a little tricky, but just sew slow and make sure you gather equally to make a neat corner.
And there! You're done with a pretty blue gray chair for only $19!
Perfect for our rental, where I don't want to spend a lot of $ furnishing a temporary space!
Monday, July 13, 2009
Just because I think they're pretty...
Our little garden


If you ask my mom, she will assuredly tell you that I did not inherit the fabulous green thumb of either my parents. My mom creates beautiful flower gardens every year, they are seriously incredible. My dad has a huge vegetable garden every year, and ends up with more tomatoes, cucumbers and pumpkins then he knows what to do with. Me however? I kill house plants. Hearty, impossible-to-kill house plants. But, there may just be hope for me yet!
In April, Greg and I were bored on Sunday afternoon and decided to buy some seeds at the hardware store and try our luck with a little garden. At that point, we weren't sure where we'd end up living, so we just planted them in a little plant tray. When we moved to Manchester, we dug a little spot in the backyard, transplanted our little seedlings, and hoped for the best. As you can see, we didn't do so bad. I "harvested" 27 green beans last Thursday!
Subscribe to:
Posts (Atom)


