Showing posts with label thriftiness. Show all posts

Thursday, January 31, 2013

Repurpose a pilly tee

Do you have one of these shirts? The ones you buy at Target and just love because they are soft and comfy and only $8. I have a bunch. They are a staple in my mommy wardrobe. But when you wear and wash an $8 tee, it starts to get pilly after awhile. Which is to be expected because what do you expect for $8, but still a little discouraging all the same.
I hate throwing things out. Well, actually I love throwing things out since I hate clutter, but I hate throwing out something if it can be useful. Especially my old favorite tee. It's like a good friend that has seen me through many a mommy catastrophe. And I just love the gray and white stripes! I decided to repurpose it somehow.
I peaked inside the tee. See that fabric in there? It's perfectly pill free! Who knew?
I cut the shirt into two pieces so that I could use it to cut out a tunic for Gracie girl. I just turned the fabric over, so that what used to be the inside of the shirt was now the outside of the tunic.

And then I cut out my pattern and sewed up the tunic. 

I used some light pink knit from my stash, because I am just loving gray and pink as a color combo right now. But this woman's size small tee was plenty big enough to make a complete size 2T shirt.

If you want a great tutorial for making a raglan shirt, I used this tutorial from Craftiness is not Optional. It's a great one!
I just lengthened it a bit so it would fit more like a tunic and last a little longer for little miss perpetual growth spurt.
I added a bow at the collar. It hides the seam where I sewed the neckline together, and looks cute to boot. :)
Now Gracie has a soft and comfy new tunic, which actually looks new! 
And it was free.
Free is good!

Thursday, March 1, 2012

Sweater & pattern refashions

Even though we are approaching spring here in PA, it's still chilly enough for cozy sweaters. Gracie needed a few warmer clothes to get her through till the warm weather shows up, since she of course basically outgrew everything in her closet over night. So I whipped her up this little cutie:
I love a good refashion. I mean, who doesn't? It's free. I like free. So I went "shopping" in my own closet and found a turtleneck sweater that I never wore anymore. It never really fit all that great to begin with so I was happy to chop it up!
Using my "lil blue boo sienna dress" pattern, I took that worn out sweater and turned it into this little sweater.
I think it's sometimes overlooked that you can take a pattern and alter it just slightly to fit what you desire. Here I shortened the dress pattern and cut the sides straight down instead of angled out. It was a super simple adjustment and I didn't have to buy a whole new pattern. I guess you could call it refashioning a pattern to refashion a sweater? A confusing way to say, use whatcha got!
I used the bottom hem of the sweater and sleeves when cutting out the pattern, and used a portion of the neck from the original sweater. This saves so much time and keeps your refashioned sweater looking much more professional.
And to avoid hearing "Oh, how old is your little boy" one more time in the grocery store, I added a little bow with a strip of sweater. 
Since I have used the sienna dress pattern so many times, I was able to whip up this little sweater during Gracie's nap time AND have time leftover to waste with a diet coke and Pinterest. Win! 
Have a great day everyone!

Tuesday, May 24, 2011

The Little Table That Could

Is it just me or has everyone had a table in this style and finish at some point in their lives? I bought this set ten years ago at a yard sale...and who knows how old it was when I bought it?
The "BEFORE"...the little table pretending to be a dining table in our last house.
The style is ok, but I've never liked the finish. It's just a little too country for my taste. I like my country on the radio, not in my kitchen. The chairs kicked the bucket months (which probably should have been years) ago, but this little table is not even the least bit wobbly after all these years. And the fact that it's on the small side has been a bonus, as we have lived in some tight quarters before. So alas, it has followed me around from place to place through our many moves, and was showing a lot of wear and tear as a result.

Motivated by my endless talk that we desperately needed to upgrade our table to something from this century, my dear husband offered to help me give it a little face lift!
He sanded the top to the bare wood, stained it this great walnut color, and topped it off with 4 coats of poly.
 He spray painted the legs an almond color. We used Rustoleum, which gives awesome coverage without all those drippy drips.
And I absolutely LOVE the result.
I guess this little table will be sticking around for a while longer.

And remember these beloved chairs? (I posted about their makeover here.) They're a bit big for this little table, so they'll be relocated to our dining room in our new house...and this little table will become our breakfast table in our new  kitchen.


Linking to:
My Uncommon Slice of Suburbia

Monday, May 9, 2011

Personalized Beach Gear

Our niece Ally turned 10 a few weeks ago. Her family lives in Clemson, South Carolina, and if you know anything about this town...they bleed orange and purple! Ally's on the town's swim team, so I made her a quick birthday present of a few swim "accessories" to use after swim practice, or on one of their many trips to the lake.
The purple terry cloth cover up I picked up at Target, and added an "A" for Ally to the front...
and the iconic Clemson tiger paw to the back.
I used an orange washcloth to make both appliqués. Any old fabric would work, but I liked the idea of keeping this beach/swim dress consistently terry cloth.
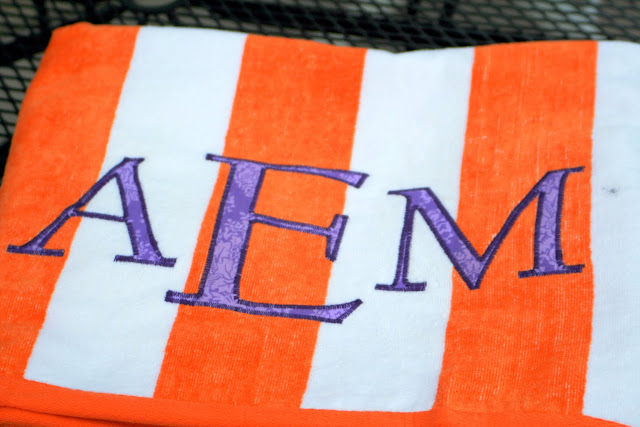
I also picked up this orange & white striped beach towel (for $6.99!) again, from Target, which I monogrammed with Ally's initials.
The letters are just an applique I cut out of regular quilters cotton. I did changed my stitch setting so that the zig zag stitches were super close together...both because I hoped it would help against fraying and I liked the border that it created. I also treated the edges with fray check. Not sure if that will help or not, but towels get a lot of heavy use, so I figured it couldn't hurt.
With my various projects the last few years for Ally & her family, I'm getting pretty good at these tiger paws...maybe I need to set up shop in Clemson?!
This project was so quick & easy, everyone should make some swim or beach gear for your favorite team! 
A fun way to root for the home team while soaking up the sun.

Tuesday, March 22, 2011

Nursery Projects: New Life for an Old Glider

I never thought the day would come! A few weeks ago, I posted about our Craigslist glider purchase. This was our first baby room purchase and I had a great vision to restore the chair, save some money, and have a beautiful little resting place to soothe our new baby.

To be honest, this project proved to be a bit of a bear for me! 
But I am finally finished and quite pleased with the result...

Remember what we started with? The wood was very dirty and the cushions were worn, torn & very stained. {I think this chair lived in a barn for the last 10 years!} Not to mention I was not a fan of the "seashell-esque" back cushion!

I liked the crisp white that the glider was already painted, so first I cleaned it up with soap & elbow grease.
New foam purchased with my trusty 50% off Joann's coupon was well worth the $20 for new cushions...
I knew that I wanted a tufted look, which I created using buttons that I covered in the same fabric. And since this was going in a nursery, I used big 2 inch buttons to add a bit of whimsy.
The fabric was a remnant at my local fabric store, which I purchased for around $10. It is a velvety microfiber, in a soft neutral gray color. It's super soft, perfect for snuggling up with a new baby.
Padded arm covers created using left over foam & batting will be perfect for resting Momma's arms...
And a matching ottoman is a soft place to put tired feet...
There are so many of these gliders for sale second hand on Craigslist and thrift stores. When you add a little hard work, elbow grease, and imagination you really can save a lot of money and rescue a tired old chair!
And create a soft & cozy place for snuggling that new baby of ours...

{And the way I see it, the more dollars you save on nursery furniture, the more you can spend on those adorable itty bitty outfits...right?!}

Linking up to the following Link Parties this week!

Transformation Thursday


Friday, March 18, 2011

Copy Cat Chic

This morning through my blog clicking travels, I came across the blog Cop Cat Chick.

Please tell me that I haven't been living under a blogging rock & I'm not the last person on earth to find this? Anyway, just in case I'm NOT, I wanted to share it so that others can enjoy the goodness.

What is so great is that Reichel will take an expensive decor item...dresser, bed, area rug, lamp, etc...and tell you where you can buy it for a fraction of the price. It's genius really. She also has a section for kids, which I have been drooling over all morning in my quest for nursery decor.

So grab your morning coffee, and check it out for yourself! But be warned, you might be there for hours. (It's addicting!)

Saturday, March 12, 2011

First Baby's Room Project

A Glider. 
What every new momma needs (or so I'm told!)

Greg and I bought our very first piece of nursery furniture today! Ok. So she needs a little TLC. {I spared you the close ups of the dirt, stains, and wear.} But she's sturdy, was only $40 on Craigslist, and for over $200 new, I figured with a little work I can make her sparkle again!

Oh, do I have grand plans for this chair. 
Check back soon to see what I come up with!

Wednesday, February 16, 2011

Hidden Tab Curtain: A Tutorial

This project all started with a design dilemma trifecta.

1. We have a small window in our master bath that looks across onto another townhouse. It has no blinds, so you find yourself thinking, "Hi neighbor!" every time you get out of the shower. Awkward!

2. The landlord left his curtains & rods up when he moved out. Which was nice! But the curtains were not my style and the rods were super-wide. I'm sure there is a technical term for them, but they are basically a flat metal strip that is about 3 inches wide. Have you ever tried to find a decent window covering that fits on a 3" rod? So impractical.

3. I'm cheap. Which I may have mentioned once or a few hundred times before. But I am. And I didn't want to spend big bucks on something to fit this uber-wide rod. {And I'm lazy. So I nor did I want to buy or install a new rod.}

(Ok, so that was 4 things...but trifecta really has such a fun ring to it. And I don't think "quadfecta" is a word.)

So I set out to solve my no blinds-wide rod-cheap wifey trifecta.

I dug through my box of window coverings, hoping that there was some sort of relief in there. I found some white sail cloth tab curtains that I bought for my office in my last house. They're from Target. The tabs seemed to be just the right height...hmmmm.
So I whipped up a hidden tab curtain panel!


It was a snap to whip up. Want to see how I did it? Of course you do.

Start with a regular tab top curtain.
I ironed all the tabs backwards against the back of the panel.
Then stitched the tabs to the panel. I just did a single line of stitching along the very bottom edge of each tab. (This way, I can undo the stitching later to restore the panel to its intended use if I so choose.)
Then I looped the tabs onto the curtain rod.
This is what your curtain panel will look like from the front. We've just created a hidden tab curtain!
I also made a pull back so that I could leave the panel open to let light into the bathroom during the day.

I made a simple tie back out of some scrap seer sucker. 
I attached two drapery rings to each end. (You can buy these for $5 a package at Target.)
Then I just tapped a small nail into the wall next to the window frame, and hung the loops onto it.
You could use a hook if you're concerned with appearances...but no one can really see this part. :)
And success!
The ugly metal rod is hidden, and we have a breezy, beachy curtain! {And some privacy. Hooray!}


Linking up to these fun parties this week:
Transformation Thursday at The Shabby Chic Cottage
Frugal Friday at The Shabby Nest